|
 |
|
|
|
|
|
|
Whirlpool Washer Repair
Appliance repair
>
Washers
>
Whirlpool Washer >
Repairing agitator problems
READ THIS FIRST!
Warning! To avoid personal
injury or death, always unplug the appliance or disconnect the power before
attempting any repairs. Always turn off the gas at the source before repairing
any gas appliance. Always wear safety glasses when using tools. Keep loose
clothing and hair away from any moving parts. Safety is of major importance when
performing any service or repair on any electrical appliance.
By reading this page you state that you have read and agreed to RepairAve.com's
Disclaimer and Terms of Use. |
Repairing Agitator Problems
Whirlpool® washing machines (direct drive)
|
|
|
|
| Instructions |
Illustrations |
 Disconnect
power to the washer (or unplug it). Turn off both hot and cold water lines
at the wall shut off valve. Disconnect
power to the washer (or unplug it). Turn off both hot and cold water lines
at the wall shut off valve. |
 |
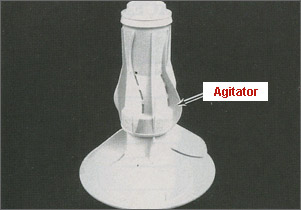
| The purpose of the
agitator is to provide a proper washing action by moving the water and
clothes around the basket. |
 |
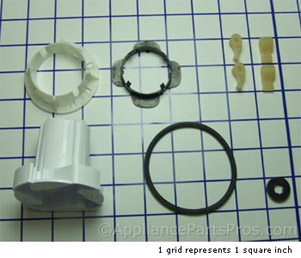
| Note: Most agitator
problems could be fixed with this inexpensive
Agitator Repair Kit (instructions included). |
 |
Removing the agitator
1. Raise the lid.
2. Pull the liquid fabric softener dispenser up (if used), to
remove it from the top of the agitator.
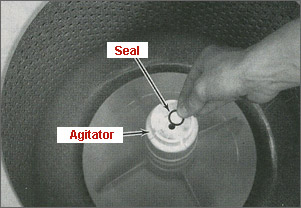
3. Insert a small screwdriver in the slot between the agitator and
cap and pry the cap off the agitator.
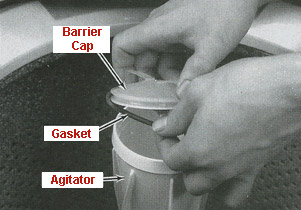
4. Reach in and remove the barrier cap and gasket by pulling up.
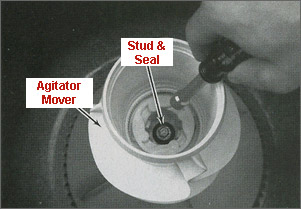
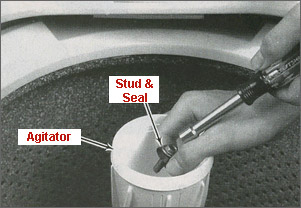
5. Using a socket wrench (with extension) or nutdriver, remove the
stud and seal which holds the agitator to the shaft.
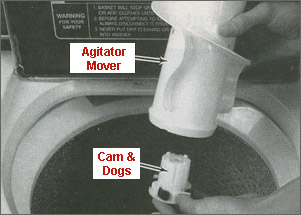
6. Remove the agitator mover by pulling this up off the agitator.
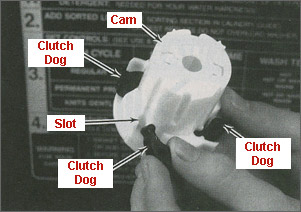
7. Turn this agitator mover over so the camp and clutch dogs (4
pieces) slide out.
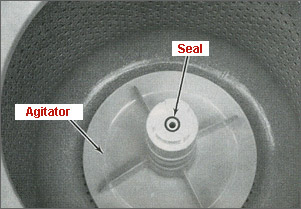
8. Carefully remove the round rubber seal off the top of the
agitator.
9. Carefully remove the agitator by lifting straight up.
10. Inspect the agitator shaft for worn grooves or rust. If the
shaft is bad (rare), either call an appliance repair company to repair this or
replace the complete gearcase yourself. |


 |
To find the
right agitator for your washer, enter the washer model number below
(where is the model number?)
|
Installing the agitator
1. Place the new agitator on the shaft.
2. Rotate the agitator until the grooves in the agitator match the
grooves on the shaft, and push the agitator down.
3. Place the new round rubber seal in the groove on top of the
agitator.
4. Hold the new camp upside down.
5. Place the small round part of the new clutch dog (4 pieces) in
the slot on the cam.
6. Do the same thing to the other three (3) clutch dogs.
7. Turn the agitator mover over and carefully insert the cam and
dogs, up into the agitator mover until the camp stops.
8. Carefully turn the agitator mover upright.
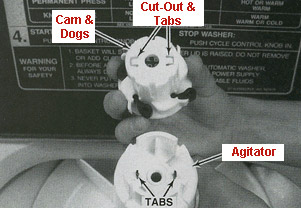
Note: The cam has a cutout and tabs across from each other. The
agitator has tabs across from each other. These must line up in order for
the came to slide down on the agitator.
9. Place the agitator mover, cam, and dogs over the agitator while
lining up the tabs.
Note: If the dog(s) falls out of the slots(s) in the cam you will
have to repeat steps 4-9.
10. Push the cam down until the tabs snap together.
11. Push the new auger agitator on the shaft.
12. Rotate the agitator until the grooves in the agitator match the
grooves on the shaft, and push the agitator down.
13. Using the socket wrench (with an extension) or nutdriver,
insert the stud and seal through the agitator, into the shaft, and
tighten.
14. Be sure the round gasket is in the groove in the barrier cap.
Note: The barrier cap must be pushed down past the holes in the
mover, so the liquid from the dispenser can flow out of the holes.
15. Push the barrier cap and gasket all the way down into the
agitator mover.
16. Press down on the liquid fabric softener dispenser or cap,
which ever you have, until it is all the way down on the agitator.
17. Close the lid.
|
 |
|
|
- Troubleshooting guide
-
How washers work
- Removing washer cabinet (Taking your washer apart)
- Replacing timer knob
- Testing/Replacing water level switch
- Testing/Replacing water inlet valve
- Replacing water inlet hoses
- Repairing agitator problems
- Replacing drive block
- Checking/Replacing water pump
- Testing/Replacing motor switch
- Checking/Replacing motor drive coupling
- Testing/Replacing washer drive
motor
If your problem is not listed, try
this site.
|
|
|
|
|
|
|