|
 |
|
|
|
|
|
|
Whirlpool Washer Repair
Appliance repair
>
Washers
>
Whirlpool Washer >
Testing/Replacing motor switch
READ THIS FIRST!
Warning! To avoid personal
injury or death, always unplug the appliance or disconnect the power before
attempting any repairs. Always turn off the gas at the source before repairing
any gas appliance. Always wear safety glasses when using tools. Keep loose
clothing and hair away from any moving parts. Safety is of major importance when
performing any service or repair on any electrical appliance.
By reading this page you state that you have read and agreed to RepairAve.com's
Disclaimer and Terms of Use. |
Testing/Replacing Motor Switch
Whirlpool® washing machines (direct drive)
|
|
|
|
| Instructions |
Illustrations |
 Disconnect
power to the washer (or unplug it). Turn off both hot and cold water lines
at the wall shut off valve. Disconnect
power to the washer (or unplug it). Turn off both hot and cold water lines
at the wall shut off valve. |
 |
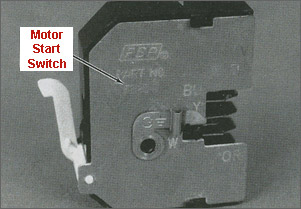
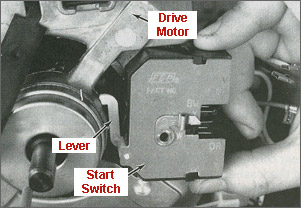
This start switch is used
in getting voltage to the motor start and run windings at the same time.
An actuating arm from the start switch rides on a sleeve inside the motor.
As the motor increases in speed, the actuating arm opens the switch and
removes the voltage from the start windings.
There are one-, two-, and three-speed start switches used on automatic
washers.
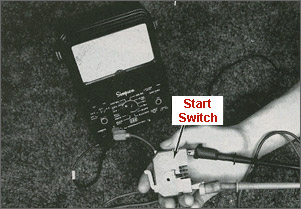
We'll need an Ohmmeter to test the motor switch.
Note: In most cases, motor switch is not available separately and
only comes with the motor. Enter your washer model number in the search
box below to see if you can get just the switch or if you need to get the
motor. |
 |
Testing the motor
start switch
1. Unplug washer or disconnect power.
2. Use the
Removing washer cabinet article
to help you get to the start switch.
3. Remove the pump.
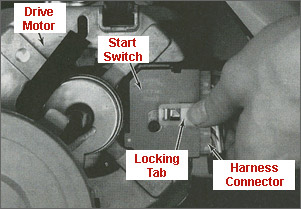
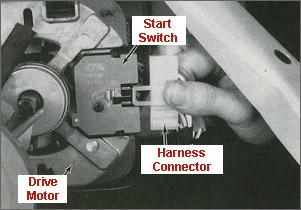
4. Remove the motor harness connector by pushing in on the locking
tab, located in the middle, and pulling apart.
5. Remove one wire at a time coming from the drive motor, carefully
labeling each wire according to the terminal marking on the start switch.
This procedure should assure that the right wire is reconnected to the
right terminal.
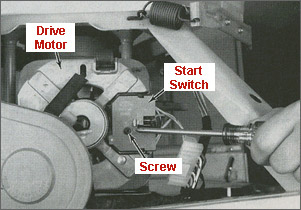
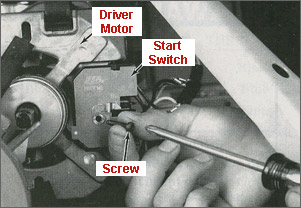
6. Using a screwdriver, remove the screw which holds the start
switch to the drive motor.
7. Se the ohmmeter scale to the lowest ohms setting and ZERO
the meter.
Note: To tell what speed start switch you have, look at the colored
wires coming from the drive motor.
| One-Speed |
Two-Speed |
Three-Speed |
Black
Blue
White
White/Black
Yellow |
Black
Blue
Violet
White
White/Black
Yellow |
Black
Blue
White
White/Black
Yellow
White/Orange
White/Violet |
|
|
To find the right
motor switch or drive motor for your washer, enter the washer model number below
(where is the model number?)
|
The following test must
be made on one-, two-, and three-speed start switches:
Start Mode
1.
Touch and hold one ohmmeter probe to the terminal R.
2. Touch the other ohmmeter probe to the terminal BK.
3. With the start lever pushed in, the ohmmeter should show ZERO
resistance (continuity). If not, the start switch is bad and needs
replacing.
Run Mode
4. Touch and hold one ohmmeter probe to the terminal R.
5. Touch the other ohmmeter probe to the terminal BK.
6. With the start lever out, the ohmmeter should show an open
circuit. If not, the start switch is bad and needs replacing.
The following test must be made on two- and three-speed start switches,
along with steps 1-6:
Start Mode
7. Touch and hold one ohmmeter probe to the terminal BU.
8. Touch the other ohmmeter probe to the terminal OR.
9. With the start lever pushed in, the ohmmeter should show ZERO
resistance (continuity). If not, the start switch is bad and needs
replacing.
Run Mode
10. Touch and hold one ohmmeter probe to the terminal V.
11. Touch the other ohmmeter probe to the terminal OR.
12. With the start lever out, the ohmmeter should show ZERO
resistance (continuity). If not, the start switch is bad and needs
replacing.
|
 |
Installing the motor
start switch
1. Place the new start switch on the motor with the lever from the
start switch resting on the sleeve inside the drive motor.
2. Using a screwdriver, insert the screw through the start
switch into the drive motor and tighten.
3. Reconnect the wires from the drive motor to the proper terminals
on the start switch as previously marked.
4. Push the harness connector into the motor start switch until the
tab locks it in place.
5. Replace the pump.
6. Use the
Re-installing the cabinet article
to help you put the washer back together.
7. Plug in washer or reconnect power.
|
 |
|
|
- Troubleshooting guide
-
How washers work
- Removing washer cabinet (Taking your washer apart)
- Replacing timer knob
- Testing/Replacing water level switch
- Testing/Replacing water inlet valve
- Replacing water inlet hoses
- Repairing agitator problems
- Replacing drive block
- Checking/Replacing water pump
- Testing/Replacing motor switch
- Checking/Replacing motor drive coupling
- Testing/Replacing washer drive
motor
If your problem is not listed, try
this site.
|
|
|
|
|
|
|