|
 |
|
|
|
|
|
|
Whirlpool Washer Repair
Appliance repair
>
Washers
>
Whirlpool Washer >
Testing/Replacing drive motor
READ THIS FIRST!
Warning! To avoid personal
injury or death, always unplug the appliance or disconnect the power before
attempting any repairs. Always turn off the gas at the source before repairing
any gas appliance. Always wear safety glasses when using tools. Keep loose
clothing and hair away from any moving parts. Safety is of major importance when
performing any service or repair on any electrical appliance.
By reading this page you state that you have read and agreed to RepairAve.com's
Disclaimer and Terms of Use. |
Testing and Replacing Drive Motor
Whirlpool® washing machines (direct drive)
|
|
|
|
| Instructions |
Illustrations |
 Disconnect
power to the washer (or unplug it). Turn off both hot and cold water lines
at the wall shut off valve. Disconnect
power to the washer (or unplug it). Turn off both hot and cold water lines
at the wall shut off valve. |
 |
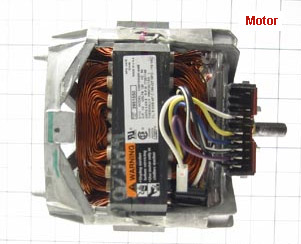
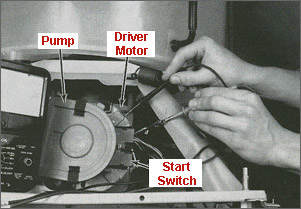
The main drive motor
supplies the power to the pump, gearcase, and basket drive. There are
one-, two-, and three-speed motors used on automatic washers.
We'll need an Ohmmeter to test the drive motor.
Note: Most Whirlpool washers come equipped with a
2 speed drive motor, which you can
purchase for less here. If you are not sure what kind of motor your
washer has, enter the washer model number in the search box below. Please
remember, the following information is provided to you free of charge, so
support us by purchasing your appliance parts from our
trusted appliance parts suppliers. |
 |
Testing the drive motor
1. Unplug washer or disconnect power.
2. Use the
Removing washer cabinet article
to help you get to the motor.
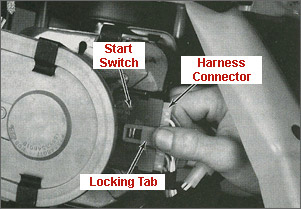
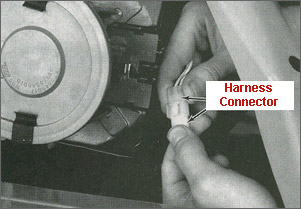
3. Remove the two(2) motor harness connectors (only one might be used) by
pushing in on the locking tab, located in the middle, and pulling apart.
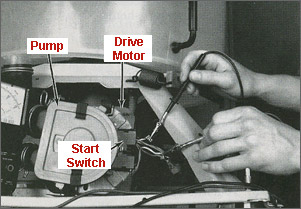
4. Remove one wire at a time coming from the drive motor, carefully
labeling each wire according to the terminal marking on the start switch.
This procedure should assure that the right wire is reconnected to the
right terminal.
5. If your drive motor has a capacitor mounted on it, remove the wires
from the capacitor, carefully labeling each wire.
6. Refer to the instructions that came with your ohmmeter to find the
proper scale to measure 1-10 ohms. Set the ohms scale and zero the
meter.
Note: To tell what speed drive motor you have, look at the colored
wires coming from the drive motor.
| One-Speed |
Two-Speed |
Three-Speed |
Black
Blue
White
White/Black
Yellow |
Black
Blue
Violet
White
White/Black
Yellow |
Black
Blue
White
White/Black
Yellow
White/Orange
White/Violet |
|
|
To find the right
motor or any other part for your washer, enter the washer model number below
(where is the model number?)
|
The following test must
be made on one-, two-, and three-speed drive motors:
1. Touch and hold one ohmmeter probe to the terminal on the
white/black wire from the motor.
2. touch the other ohmmeter probe to the terminal on the white wire
from the motor.
3. The ohmmeter should show ZERO resistance (continuity). If
not, the drive motor is bad and needs replacing.
Start Winding
4. Touch and hold one ohmmeter probe to the terminal on the black wire
from the motor.
5. Touch the other ohmmeter probe to the terminal on the yellow
wire from the motor.
6. The ohmmeter should show a reading between 4-10 ohms.
7. If you do not get this reading, the drive motor is bad and needs
replacing.
High Winding
8. Touch and hold one ohmmeter probe to the terminal on the white wire
from the motor.
9. touch the other ohmmeter probe to the terminal on the blue wire
from the motor.
10. The ohmmeter should show a reading between 0-4 ohms.
11. If you do not get this reading, the drive motor is bad and
needs replacing.
12. Touch and hold one ohmmeter probe to the terminal on the
white/black wire from the motor.
13. Touch the other ohmmeter probe to the terminal on the blue wire
from the motor.
14. The ohmmeter should show a reading between 1-5 ohms.
15. If you do not get this reading, the drive motor is bad and
needs replacing.
The following test must be made on two-speed drive motors, along with
steps 1-15:
Low Winding
16. touch and hold one ohmmeter probe to the terminal on the violet
wire from the motor.
17. Touch the other ohmmeter probe to the terminal on the white
wire from the motor.
18. The ohmmeter should show a reading between 1-7 ohms.
19. If you do not get this reading, the drive motor is bad and
needs replacing.
20. Touch and hold one ohmmeter probe to the terminal on the violet
wire from the motor.
21. Touch the other ohmmeter probe to the terminal on the blue wire
from the motor.
22. The ohmmeter should show a reading between 1-7 ohms.
23. If you do not get this reading, the drive motor is bad and
needs replacing.
24. Touch and hold one ohmmeter probe to the terminal on the violet
wire from the motor.
25. Touch the other ohmmeter probe to the terminal on the
white/black wire from the motor.
26. The ohmmeter should show a reading between 1-7 ohms.
27. If you do not get this reading, the drive motor is bad and
needs replacing.
The following test must be made on three-speed drive motors, along with
steps 1-27:
Ex-Low Winding
28. Touch and hold one ohmmeter probe to the terminal on the white
wire from the motor.
29. Touch the other ohmmeter probe to the terminal on the white/orange
wire from the motor.
30. The ohmmeter should show a reading between 1-5 ohms.
31. If you do not get this reading, the drive motor is bad and
needs replacing.
32. Touch and hold one ohmmeter probe to the terminal on the white
wire from the motor.
33. Touch the other ohmmeter probe to the terminal on the
white/violet wire from the motor.
34. The ohmmeter should show a reading between 1-5 ohms.
35. If you do not get this reading, the drive motor is bad and
needs replacing.
36. Touch and hold one ohmmeter probe to the terminal on the blue
wire from the motor.
37. Touch the other ohmmeter probe to the terminal on the
white/orange wire from the motor.
38. The ohmmeter should show a reading between 1-5 ohms.
39. If you do not get this reading, the drive motor is bad and
needs replacing.
40. Touch and hold one ohmmeter probe to the terminal on the blue
wire from the motor.
41. Touch the other ohmmeter probe to the terminal on the
white/violet wire from the motor.
42. The ohmmeter should show a reading between 1-5 ohms.
43. If you do not get this reading, the drive motor is bad and
needs replacing.
44. Touch and hold one ohmmeter probe to the terminal on the
white/black wire from the motor.
45. Touch the other ohmmeter probe to the terminal on the
white/orange wire from the motor.
46. The ohmmeter should show a reading between 1-5 ohms.
47. If you do not get this reading, the drive motor is bad and
needs replacing.
48. Touch and hold one ohmmeter probe to the terminal on the
white/black wire from the motor.
49. Touch the other ohmmeter probe to the terminal on the
white/violet wire from the motor.
50. The ohmmeter should show a reading between 1-5 ohms.
51. If you do not get this reading, the drive motor is bad and
needs replacing.
52. Touch and hold one ohmmeter probe to the terminal on the
white/orange wire from the motor.
53. Touch the other ohmmeter probe to the terminal on the
white/violet wire from the motor.
54. The ohmmeter should show a reading between 2-8 ohms.
55. If you do not get this reading, the drive motor is bad and
needs replacing.
The following three (3) checks must be made on all one-, two-, and
three-speed drive motors to check for an internal failure (short):
56. Touch and hold one ohmmeter probe to the drive motor housing.
57. One at a time touch the other ohmmeter probe to each of the wires
(terminals) coming from the drive motor.
58. The ohmmeter should show an open circuit when each of the wires
(terminals) are checked. If not, the drive motor is bad and needs
replacing.
|
|
Installing the drive
motor
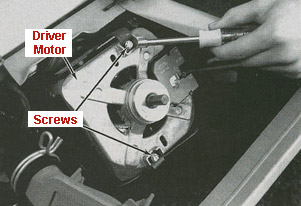
1. Remove the pump.
2. Using a screwdriver, remove the screws (if used) which hold the
top and bottom retainers to the front of the drive motor.
Note: These screws are not needed anymore; they were mainly used
during shipping.
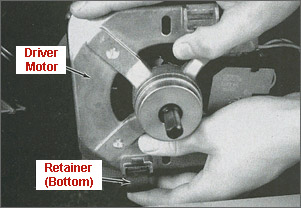
3. Using a screwdriver or your hand, unsnap the bottom retainer
from the drive motor.
4. Place one hand under the drive motor to support it when removing
the top retainer.
5. Using a screwdriver or your hand, unsnap the top retainer from
the drive motor.
6.Carefully pull the drive motor straight out.
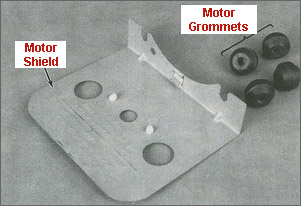
7. There is a motor shield which will fall when the drive motor is
removed. You will replace this later.
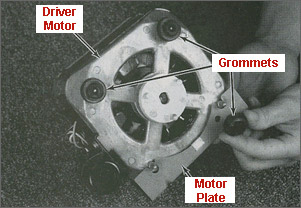
8. There will be four (4) motor grommets which may come off when
the drive motor is removed, or they will stick on the mounting plate.
Remove these.
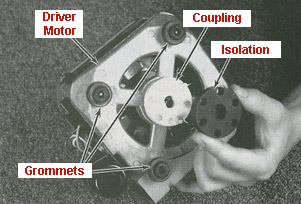
9. There will be a rubber isolation which will come off when the
drive motor is removed, or it will stick on the gearcase coupling. Remove
this.
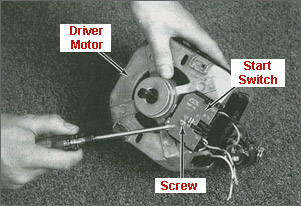
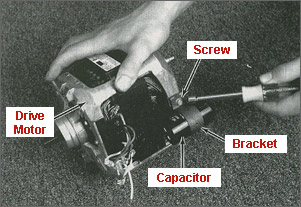
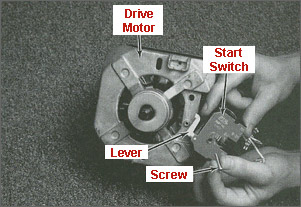
10. Using a screwdriver, remove the screw which holds the start
switch to the drive motor.
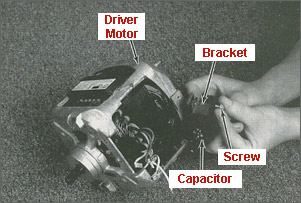
11. Using a screwdriver or nutdriver, remove the screw which holds
the capacitor and bracket (if used there) to the drive motor.
12. Carefully remove the bracket and capacitor.
13. Replace the bracket and capacitor (if used there) on the new
drive motor.
14. Using a screwdriver or nutdriver, insert the screw through the
capacitor bracket into the new drive motor and tighten.
15. Place the start switch on the new drive motor with the lever
from the start switch resting on the sleeve inside the drive motor.
16. Using a screwdriver, insert the screw through the start switch
into the drive motor and tighten.
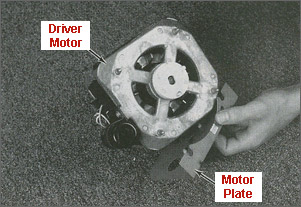
17. Slide the bottom motor plate on the bottom studs on the new
drive motor.
18. Place the four (4) rubber grommets on the studs on the back of
the new drive motor with the large end facing the motor.
19. Place the rubber isolation, on the coupling on the new drive
motor, by lining up the holes in the isolation with the studs on the
coupling, and then push on.
20. Turn the isolation and coupling on the new drive motor, lining
up the holes with the studs on the other coupling on the gearcase.
21. Place the new drive motor on the motor mounting plate so the
isolation and rubber grommets fit in place.
22. Using a screwdriver or your hand, snap the bottom retainer over
the new drive motor.
23. Using a screwdriver or your hand, snap the top retainer over
the new drive motor.
Note: The screws are not needed anymore, they were mainly used
during shipping.
24. Reconnect the wires from the drive motor to the proper
terminals on the start switch as previously marked.
25. Reconnect the two (2) wire connectors (only one might be used)
to the proper terminals as previously marked.
26. Reconnect the capacitor wires (if used) as previously marked.
27. Re-install the pump.
28. Use the
Re-installing the cabinet article
to help you put the washer back together.
29. Plug in washer or reconnect power.
30. Run a cycle check.
|

 |
|
|
- Troubleshooting guide
-
How washers work
- Removing washer cabinet (Taking your washer apart)
- Replacing timer knob
- Testing/Replacing water level switch
- Testing/Replacing water inlet valve
- Replacing water inlet hoses
- Repairing agitator problems
- Replacing drive block
- Checking/Replacing water pump
- Testing/Replacing motor switch
- Checking/Replacing motor drive coupling
- Testing/Replacing washer drive
motor
If your problem is not listed, try
this site.
|
|
|
|
|
|
|